")
")
Trong bài này tôi sẽ hướng dẫn các bạn thực hiện một bài tập nhỏ với laravel.
Yêu cầu bài tập: Tạo một bảng dữ liệu học sinh gồm 2 thông tin (tên học sinh, số điện thoại) và viết chức năng thêm, sửa, xóa, hiển thị danh sách.
Bước 1: Tạo cơ sở dữ liệu và bảng dữ liệu, tạo link cho các chức năng.
Trước tiên các bạn cần tạo một cơ sở dữ liệu và chỉnh cấu hình kết nối với cơ sở dữ liệu.
Ví dụ: - Tôi đã tạo một cơ sở dữ liệu trong Mysql có tên là: laravel_db
- Cấu hình lại file .env với 3 dòng: database, username, password.
DB_DATABASE=laravel_db
DB_USERNAME=root
DB_PASSWORD=vertrigo
Tiếp theo các bạn tạo bảng dữ liệu cho cơ sở dữ liệu laravel_db . Các bạn có thể tạo thẳng trong Mysql hoặc có thể tạo theo cách sau.
- Tại thư mục tổng các bạn mở Open command và gõ lệnh sau:
php artisan make:migration tenbang
- Sau đó các bạn vào thư mục "database/migrations" mở file php với tên bảng vừa tạo và sửa hàm public function up() và hàm public function dow() thành như sau:
public function up()
{
	Schema::create('tbl_hocsinh', function (Blueprint $table) {
		$table->increments('id');
		$table->string('tenhocsinh', 255);
		$table->string('sodienthoai', 15);
		$table->timestamps();
	});
}

public function down()
{
	Schema::dropIfExists('tbl_hocsinh');
}
- Tiếp theo các bạn tạo quay lại trong open command và gõ lệnh sau.
php artisan migrate
Sau khi thực hiện xong các bạn sẽ có bảng dữ liệu là "tbl_hocsinh".
Tiếp theo các bạn tạo file controller cho bảng học sinh. Trong open command các bạn gõ lệnh sau:
php artisan make:controller HocsinhController ––resource
Sau khi rõ lệnh trên trong thư mục "app/Http/Controllers" sẽ có file HocsinhController.php . Mọi thao tác xử lý dữ liệu sẽ được thực hiện trong file này.
Tiếp theo các bạn tạo link cho các chức năng thêm, sửa, xóa và hiển thị danh sách. Các bạn vào thư mục routes và mở file web.php và thêm dòng code sau:
Route::get('hocsinh', 'HocsinhController@index'); // Hiển thị danh sách học sinh
Route::get('hocsinh/create', 'HocsinhController@create'); // Thêm mới học sinh
Route::post('hocsinh/create', 'HocsinhController@store'); // Xử lý thêm mới học sinh
Route::get('hocsinh/{id}/edit', 'HocsinhController@edit'); // Sửa học sinh
Route::post('hocsinh/update', 'HocsinhController@update'); // Xử lý sửa học sinh
Route::get('hocsinh/{id}/delete', 'HocsinhController@destroy'); // Xóa học sinh
Đoạn code trên có nghĩa như sau:
- Route::get là link với giá trị trả về là phương thức get.
- Route::post là link với giá trị trả về là phương thức post.
- Trong dấu ngoặc đơn có nghĩa như sau: ('đường dẫn do người lập trình tự đặt','tên file controller được chọn@tên hàm trong controller được thực hiện')
Bước 2: Thực hiện chức năng thêm học sinh.
- Tạo giao diện master: trang master sẽ là trang có cấu trúc chung để các trang con kế thừa (nó có nghĩa như trang index).
+ Trong thư mục "resources/views" các bạn tạo thư mục tên là "templates".
+ Trong thư mục "templates" vừa tạo các bạn tạo file "master.blade.php" và chép đoạn code sau.
<!DOCTYPE html>

<html>

<head>

    <meta charset="utf-8">

    <meta http-equiv="X-UA-Compatible" content="IE=edge">

    <title> @yield('title')</title>

    <link href="/{!! url('public/css/bootstrap.min.css') !!}" type="text/css" rel="stylesheet" />

	<link href="/{!! url('public/css/dataTables.bootstrap.min.css') !!}" type="text/css" rel="stylesheet" />

	<link href="/{!! url('public/css/bootstrap-custom.css') !!}" type="text/css" rel="stylesheet" />

</head>

<body>

    <div class="container">

        @section('content')

        @show

    </div>

	<script type="text/javascript" src="/{!! url('public/js/jquery.min.js') !!}"></script>

	<script type="text/javascript" src="/{!! url('public/js/bootstrap.min.js') !!}"></script>

	<script type="text/javascript" src="/{!! url('public/js/jquery.dataTables.min.js') !!}"></script>

	<script type="text/javascript" src="/{!! url('public/js/dataTables.bootstrap.min.js') !!}"></script>

	<script type="text/javascript">

		$(document).ready(function() {

			$("#DataList").DataTable({

				"aLengthMenu": [[10, 25, 50, 100, -1], [10, 25, 50, 100, "Tất cả"]],

				"iDisplayLength": 10,

				"oLanguage": {

					"sLengthMenu": "Hiển thị _MENU_ dòng mỗi trang",

					"oPaginate": {

						"sFirst": "<span class='glyphicon glyphicon-step-backward' aria-hidden='true'></span>",

						"sLast": "<span class='glyphicon glyphicon-step-forward' aria-hidden='true'></span>",

						"sNext": "<span class='glyphicon glyphicon-triangle-right' aria-hidden='true'></span>",

						"sPrevious": "<span class='glyphicon glyphicon-triangle-left' aria-hidden='true'></span>"

					},

					"sEmptyTable": "Không có dữ liệu",

					"sSearch": "Tìm kiếm:",

					"sZeroRecords": "Không có dữ liệu",

					"sInfo": "Hiển thị từ _START_ đến _END_ trong tổng số _TOTAL_ dòng được tìm thấy",

					"sInfoEmpty" : "Không tìm thấy",

					"sInfoFiltered": " (trong tổng số _MAX_ dòng)"

				}

			});

		});

	</script>

</body>

</html>
Các file .css, .js các bạn có thể tìm và download trên mạng.
Trong đoạn code trên có một số phần cần chú ý:
+ @yield('title') : dùng để tùy ý thay đổi title khi vào trang con.
+ @section('content')@show : dùng để tùy ý thay đổi nội dung <body> của trang khi vào trang con.
- Tạo giao diện thêm học sinh:
+ Thêm đoạn code sau cho hàm create() trong file HocSinhController.php
public function create()
{
	//Hiển thị trang thêm học sinh
	return view('hocsinh.create');
}
Đoạn code trên sẽ chay file create.blade.php trong thư mục "resources/views/hocsinh".
+ Trong thư mục "resources/views" các bạn tạo thư mục tên là "hocsinh" và trong thư mục "hocsinh" các bạn tạo file "create.blade.php". Các bạn chép code mẫu sau vào file "create.blade.php":
@extends('templates.master')
@section('title','Thêm mới học sinh')
@section('content')
<div class="page-header"><h4>Quản lý học sinh</h4></div>
<?php //Hiển thị thông báo thành công?>
@if ( Session::has('success') )
<div class="alert alert-success alert-dismissible" role="alert">
<strong>{{ Session::get('success') }}</strong>
<button type="button" class="close" data-dismiss="alert" aria-label="Close">
<span aria-hidden="true">×</span>
<span class="sr-only">Close</span>
</button>
</div>
@endif
<?php //Hiển thị thông báo lỗi?>
@if ( Session::has('error') )
<div class="alert alert-danger alert-dismissible" role="alert">
<strong>{{ Session::get('error') }}</strong>
<button type="button" class="close" data-dismiss="alert" aria-label="Close">
<span aria-hidden="true">×</span>
<span class="sr-only">Close</span>
</button>
</div>
@endif
<?php //Form thêm mới học sinh?>
<p><a class="btn btn-primary" href="/{{ url('/hocsinh') }}">Về danh sách</a></p>
<div class="col-xs-4 col-xs-offset-4">
<center><h4>Thêm học sinh</h4></center>
<form action="{{ url('/hocsinh/create') }}" method="post">
<input type="hidden" id="_token" name="_token" value="{{ csrf_token() }}"/>
<div class="form-group">
<label for="tenhocsinh">Tên học sinh</label>
<input type="text" class="form-control" id="tenhocsinh" name="tenhocsinh" placeholder="Tên học sinh" maxlength="255" required />
</div>
<div class="form-group">
<label for="sodienthoai">Số điện thoại</label>
<input type="text" class="form-control" id="sodienthoai" name="sodienthoai" placeholder="Số điện thoại" maxlength="15" required />
</div>
<center><button type="submit" class="btn btn-primary">Thêm</button></center>
</form>
</div>
@endsection
Trong đoạn code trên tôi xin giới thiệu với các bạn một số phần sử dụng trong laravel:
+ @extends('templates.master'): Kế thừa giao diện từ file "master.blade.php" trong thư mục "resources/views/templates" mà chúng ta đã tạo ở trên.
+ @section('title','Thêm mới học sinh'): Thay đổi tiêu đề trang web.
+ @section('content') Nội dung trang con @endsection: Thay đổi nội dung trong <body>
- Viết hàm xử lý thêm học sinh:
+ Thêm khai báo 2 thư viện trong file "HocSinhController.php" để có thể truy xuất dữ liệu từ database và tạo session thông báo.
use Illuminate\Support\Facades\DB;
use Session;
+ Các bạn thêm đoạn code xử lý sau cho hàm store(Request $request)
public function store(Request $request)
{
	//Them moi hoc sinh
	//Set timezone
	date_default_timezone_set("Asia/Ho_Chi_Minh");

	//Lấy giá trị học sinh đã nhập
	$allRequest  = $request->all();
	$tenhocsinh  = $allRequest['tenhocsinh'];
	$sodienthoai = $allRequest['sodienthoai'];

	//Gán giá trị vào array
	$dataInsertToDatabase = array(
		'tenhocsinh'  => $tenhocsinh,
		'sodienthoai' => $sodienthoai,
		'created_at' => date('Y-m-d H:i:s'),
		'updated_at' => date('Y-m-d H:i:s'),
	);

	//Insert vào bảng tbl_hocsinh
	$insertData = DB::table('tbl_hocsinh')->insert($dataInsertToDatabase);

	//Kiểm tra Insert để trả về một thông báo
	if ($insertData) {
		Session::flash('success', 'Thêm mới học sinh thành công!');
	}else {
		Session::flash('error', 'Thêm thất bại!');
	}

	//Thực hiện chuyển trang
	return redirect('hocsinh/create');
}
Vậy là chúng ta đã hoàn thành chức năng thêm mới học sinh.
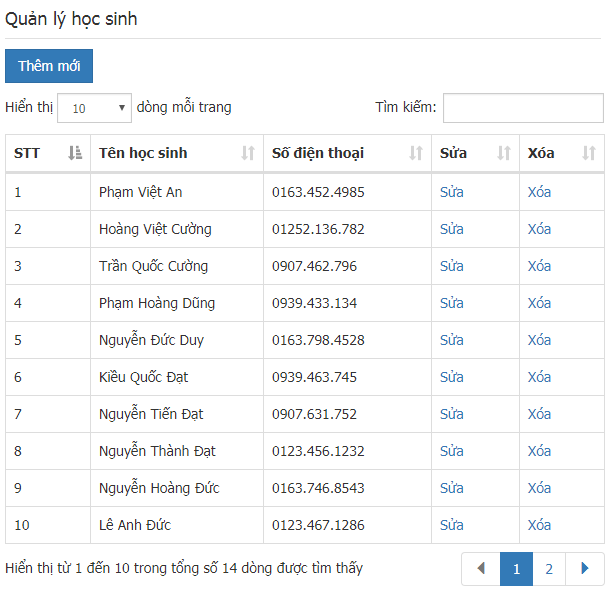
Bước 3: Thực hiện chức năng hiển thị danh sách học sinh.
- Lấy thông tin từ Database và gửi đến tầng view hiển thị lên trang web:
Các bạn thêm đoạn code sau cho hàm index() trong file "HocSinhController.php"
public function index()
{
	//Lấy danh sách học sinh từ database
	$getData = DB::table('tbl_hocsinh')->select('id','tenhocsinh','sodienthoai')->get();

	//Gọi đến file list.blade.php trong thư mục "resources/views/hocsinh" với giá trị gửi đi tên listhocsinh = $getData
	return view('hocsinh.list')->with('listhocsinh',$getData);
}
- Viết tầng view hiển thị thông tin học sinh và thêm nút sửa và xóa:
Các bạn tạo file "list.blade.php" trong thư mục "resources/views/hocsinh" và chép đoạn code sau vào.
@extends('templates.master')
@section('title','Quản lý học sinh')
@section('content')
<?php //Hiển thị thông báo thành công?>
<div class="page-header"><h4>Quản lý học sinh</h4></div>
@if ( Session::has('success') )
<div class="alert alert-success alert-dismissible" role="alert">
<strong>{{ Session::get('success') }}</strong>
<button type="button" class="close" data-dismiss="alert" aria-label="Close">
<span aria-hidden="true">×</span>
<span class="sr-only">Close</span>
</button>
</div>
@endif
<?php //Hiển thị thông báo lỗi?>
@if ( Session::has('error') )
<div class="alert alert-danger alert-dismissible" role="alert">
<strong>{{ Session::get('error') }}</strong>
<button type="button" class="close" data-dismiss="alert" aria-label="Close">
<span aria-hidden="true">×</span>
<span class="sr-only">Close</span>
</button>
</div>
@endif
<?php //Hiển thị danh sách học sinh?>
<div class="row">
<div class="col-xs-12 col-sm-12 col-md-12">
<div class="table-responsive">
<p><a class="btn btn-primary" href="/{{ url('/hocsinh/create') }}">Thêm mới</a></p>
<table id="DataList" class="table table-bordered table-hover">
<thead>
<tr>
<th>STT</th>
<th>Tên học sinh</th>
<th>Số điện thoại</th>
<th>Sửa</th>
<th>Xóa</th>
</tr>
</thead>
<tbody>
<?php //Khởi tạo vòng lập foreach lấy giá vào bảng?>
@foreach($listhocsinh as $key => $hocsinh)
<tr>
<?php //Điền số thứ tự?>
<td>{{ $key+1 }}</td>
<?php //Lấy tên học sinh?>
<td>{{ $hocsinh->tenhocsinh }}</td>
<?php //Lấy số điện thoại?>
<td>{{ $hocsinh->sodienthoai }}</td>
<?php //Tạo nút sửa học sinh?>
<td><a href="/hocsinh/{{ $hocsinh->id }}/edit">Sửa</a></td>
<?php //Tạo nút xóa học sinh?>
<td><a href="/hocsinh/{{ $hocsinh->id }}/delete">Xóa</a></td>
</tr>
<?php //Kết thúc vòng lập foreach?>
@endforeach
</tbody>
</table>
</div>
</div>
</div>
@endsection
Tới đây chúng ta đã hoàn thành chức năng hiển thị danh sách học sinh.
Bước 4: Thực hiện chức năng sửa học sinh.
Trong bước 1 chúng ta đã khai báo link sửa trong file web.php là:
Route::get('hocsinh/{id}/edit', 'HocsinhController@edit');
+ {id}: là giá trị được gửi theo phương thức get có tên biến là id. Và ở bước 3 biến id được gán bằng giá trị id từ bảng dữ liệu.
+ 'HocsinhController@edit': Gọi đến hàm edit trong file "HocsinhController.php"
Chúng ta thêm đoạn code sau cho hàm edit($id) trong file "HocsinhController.php".
public function edit($id)
{
	//Lấy dữ liệu từ Database với các trường được lấy và với điều kiện id = $id
	$getData = DB::table('tbl_hocsinh')->select('id','tenhocsinh','sodienthoai')->where('id',$id)->get();

	//Gọi đến file edit.blade.php trong thư mục "resources/views/hocsinh" với giá trị gửi đi tên getHocSinhById = $getData
	return view('hocsinh.edit')->with('getHocSinhById',$getData);
}
Tiếp theo chúng ta tạo file edit.blade.php trong thư mục "resources/views/hocsinh" và chép đoạn code sau vào.
@extends('templates.master')
@section('title','Quản lý học sinh')
@section('content')
<div class="page-header"><h4>Quản lý học sinh</h4></div>
<?php //Hiển thị thông báo thành công?>
@if ( Session::has('success') )
<div class="alert alert-success alert-dismissible" role="alert">
<strong>{{ Session::get('success') }}</strong>
<button type="button" class="close" data-dismiss="alert" aria-label="Close">
<span aria-hidden="true">×</span>
<span class="sr-only">Close</span>
</button>
</div>
@endif
<?php //Hiển thị thông báo lỗi?>
@if ( Session::has('error') )
<div class="alert alert-danger alert-dismissible" role="alert">
<strong>{{ Session::get('error') }}</strong>
<button type="button" class="close" data-dismiss="alert" aria-label="Close">
<span aria-hidden="true">×</span>
<span class="sr-only">Close</span>
</button>
</div>
@endif
<?php //Hiển thị form sửa học sinh?>
<p><a class="btn btn-primary" href="/{{ url('/hocsinh') }}">Về danh sách</a></p>
<div class="col-xs-4 col-xs-offset-4">
<center><h4>Sửa học sinh</h4></center>
<form action="{{ url('/hocsinh/update') }}" method="post">
<input type="hidden" id="_token" name="_token" value="{!! csrf_token() !!}" />
<input type="hidden" id="id" name="id" value="{!! $getHocSinhById[0]->id !!}" />
<div class="form-group">
<label for="tenhocsinh">Tên học sinh</label>
<input type="text" class="form-control" id="tenhocsinh" name="tenhocsinh" placeholder="Tên học sinh" maxlength="255" value="{{ $getHocSinhById[0]->tenhocsinh }}" required />
</div>
<div class="form-group">
<label for="sodienthoai">Số điện thoại</label>
<input type="text" class="form-control" id="sodienthoai" name="sodienthoai" placeholder="Số điện thoại" maxlength="15" value="{{ $getHocSinhById[0]->sodienthoai }}" required />
</div>
<center><button type="submit" class="btn btn-primary">Lưu lại</button></center>
</form>
</div>
@endsection
Tiếp theo chúng ta viết hàm xử lý sửa. Trong file "HocSinhController.php" chúng ta thêm đoạn code sau cho hàm update(Request $request)
public function update(Request $request)
{
	//Cap nhat sua hoc sinh
	//Set timezone
	date_default_timezone_set("Asia/Ho_Chi_Minh");

	//Thực hiện câu lệnh update với các giá trị $request trả về
	$updateData = DB::table('tbl_hocsinh')->where('id', $request->id)->update([
		'tenhocsinh' => $request->tenhocsinh,
		'sodienthoai' => $request->sodienthoai,
		'updated_at' => date('Y-m-d H:i:s')
	]);

	//Kiểm tra lệnh update để trả về một thông báo
	if ($updateData) {
		Session::flash('success', 'Sửa học sinh thành công!');
	}else {
		Session::flash('error', 'Sửa thất bại!');
	}

	//Thực hiện chuyển trang
	return redirect('hocsinh');
}
Vậy là chúng ta đã hoàn thành chức năng sửa học sinh.
Bước 5: Thực hiện chức năng xóa học sinh.
Trong bước 1 chúng ta đã khai báo link xóa trong file web.php là:
Route::get('hocsinh/{id}/delete', 'HocsinhController@destroy');
+ {id}: là giá trị được gửi theo phương thức get có tên biến là id. Và ở bước 3 biến id được gán bằng giá trị id từ bảng dữ liệu.
+ 'HocsinhController@destroy': Gọi đến hàm destroy trong file "HocsinhController.php"
Chúng ta thêm đoạn code sau cho hàm destroy($id) trong file "HocsinhController.php".
public function destroy($id)
{
	//Xoa hoc sinh
	//Thực hiện câu lệnh xóa với giá trị id = $id trả về
	$deleteData = DB::table('tbl_hocsinh')->where('id', '=', $id)->delete();

	//Kiểm tra lệnh delete để trả về một thông báo
	if ($deleteData) {
		Session::flash('success', 'Xóa học sinh thành công!');
	}else {
		Session::flash('error', 'Xóa thất bại!');
	}

	//Thực hiện chuyển trang
	return redirect('hocsinh');
}
Tới đây chúng ta đã hoàn thành chức năng xóa học sinh.
Qua bài này hi vọng các bạn có thể hiểu cấu trúc lập trình cơ bản với laravel và có thể thực hiện dự án php nhỏ của mình.
Chúc các bạn thành công!
Ngụy Kim Hưng